HOME

Miyerkules, Setyembre 7, 2011

ETSY FINDS! Part 2

Another cute batch of stuffs I found at Etsy! Some are sold in patterns and DIY packages. Lately it seems that I could only search baby stuffs because of my preggers sister's due is nearing anytime soon. Unconsciously online and at the malls our steps always lead us to the babies' section. My sister even succumbed to online shopping for the first time just so she can purchase inexpensive new born shoes! But my cheapskate mind always look for free patterns that I probably won't ever accomplish. So that explains the common theme of my Etsy finds.


Sooooooo cute diba! Check it HERE!


They're soo dainty, I'd wished my sister's baby is a she, but no we're already content and happy that it's a boy! Check that BOBKA shop HERE! 


If I had the time in the world, I'll definitely put this pairs on top of my to do lists of patterns! Pero knowing me it'll take 10 years pa!lolz For now, I'll admire it nalang or you guys can just buy the pattern HERE!

My sis had also been prepping her baby's crib. She bought cute fabrics in hope that my mom can sew fim (our nickname for her baby boy) his first ever set of bedsheets, but my mom is still recovering from her operation so she just bought finished ones at the mall. Browsing Etsy under quilts, I stumbled on this shop that personalizes baby comforters.


Check it HERE, also in Etsy!

Another that caught my attention is this wall stickers. I remember the cutter-plotter (machine) here at the office that cuts tacky car decals. Though we only have limited colors of stickers to select from, I think it'll work nicely on walls specially if one color lang I'll use. If you're interested to try wall stickers on a budget, Japan home and American store has cheap ones that will only cost you P88 and P200 pesos! So go now na!


Check it, check it HERE!


And here's another cutie na not necessarily only for babies! I've been meaning to try something like this (kung kaya lang naman ng powers ko) but couldn't find the time between lazing around at home and dating my cutie tanunoy hahahha!


Guess who is this royalty recently married to Kate Middleton?
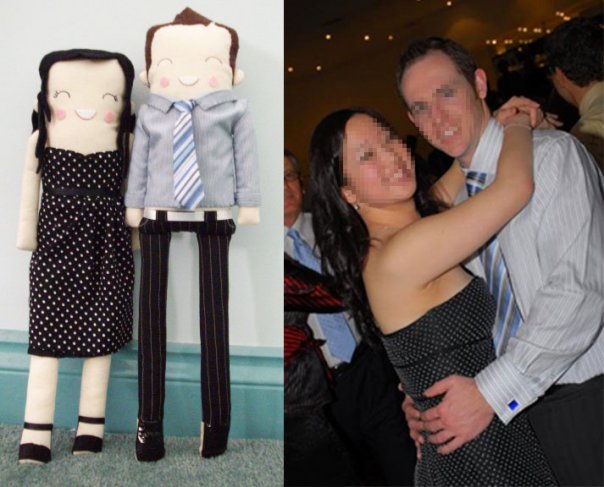
The first time I saw this in etsy, I was like OMG! sooo genius this chinese looking gal who's operating STITCHY LOVE Shop that makes personalized dolls! This shop operates in Australia and makes a lot of cute dolls of their client's likeness! Search their account in facebook, just type stitchy love. You'll enjoy it!! Below are some if you won't take my word and search it.


Super cute noh? The main body of this dolls are made of felt fabric! The same one I used on that PIG toy!


That's all I got guys..Until next time! Ciao!!

Huwebes, Agosto 25, 2011

ETSY FINDS: projects I would love to do!!!

Kung kaya lang ng powers ko that is. I found these at etsy.com last month and I still hadn't cut a single pattern. I haven't even sewn anything after that tote tutorial I did last time. My mom just had her right breast operated so, the last thing I would rather do is clean up our sewing area and get on with my sewing. So my drained blogging mojo kinda had something to do with my mom's health lately. Everything is now taken care of and I believes in my heart that my mom can out live us all!


Back to this super cute projects I'm tricking my mind into completing! XP Saw this and I immediately fell inlove. Already I imagined myself sewing this up until I saw my sister's camera and see the irregular shapes and thought twice doing it. But I know I can do this!!! Definitely not in the nearest future but I will!!


Check it at Etsy HERE

Can't see myself wearing this but its perfect for my niece.
Click HERE to see the shop behind this!

Simply cute noh?! wala lang I already closed the window and forgot to put the link!

Even this drab camera bag looks easy to construct!  Click HERE for specs and stuffs!

You know the drill....herrrreeeeeeee!


Then even have this green-minded missified denim version of that previous belt bag.Cutie diba!!??

I know some don't look much but construction wise, I know I can whip up something like this in the future! Stay tuned for that miracle!

There you have it! Those what's causing some brain activity in my head, instead of focusing on my career hahhah. If I'm staring at you blankly or funny, I'm figuring out how to do this. Hope this post inspires you too cause it certainly did filled my cabinet chest of ideas! I just wish my followers will no longer consists of my sister,cousin and officemate! LOLZ
Follow me guys! C'mon! You're missing something good here!! 'aight!!! ;-) LOLZ
Until next time! mwah mwah


Huwebes, Agosto 18, 2011

engraving a wine glass... sandblasting style!

Sandblasting is the method we use in engraving crystals. It is where fine sand is blasted in the crystal, leaving an abrasion or engraving on. Sometimes we got requests to engrave ordinary utensils at home like pitcher, beer mugs, wine glass (like that below) etc.


First step is where my superior skills in graphics came in handy XP. We lay-out the texts in illustrator or wherever software we can print high resolution images or texts. We then print it into crystal film in actual size.


CS5 Illustrator, I also use CorelDRAW for this 


I would have loved to show you guys photos of the early stages but I got in production late. The glass is already contacted w/ photo emulsion (yellow solution that protects areas that shouldn't be sandblasted).


Contact (term they use in production) is done by coating the glass with photo emulsion and sticking it with the printed crystal film. It is then placed under a 500 watts halogen bulb in a makeshift compartment to dry, and also not to be exposed by other light. The space surrounding the texts (not covered with print) will dry harder and stronger, thus protecting the surface from sand. Once dried, highly pressurized water is used to remove those parts not contacted by halogen light.


Masking tape is then put around for added protection of glass


Second touches of emulsion is then applied to spotted holes to ensure only the texts will be blasted. Below is the model of machine used, heard its worth a million daw hmmm 


Inside the blasting machine

That guy is kuya ramil. You've seen the hands, the broad shoulders and back, and
you've yet to see the face of this chick boy on my coming post  ^__^ hahahah

Up close, the hose he's holding emits fine bits of sand at high velocity (sounds great right? I just googled it ;-)) that engraves the letters exposed and not covered with emulsion. Afterwards, tape is removed and soak into water w/ zonrox to rinse out the emulsion.


Soak until the solution rubs off the glass

We're done! That's how commercially available glasses are personalized! Ok diba!? Please follow my blog if you find my posts informative (atleast feel na feel kong informative blog ko hahahhah). 

Here's a sample of our engraved crystal

teka phinotoshop ko lang ata to hmmm...

Repeatedly proofreading this post before posting just kills my eyes so good luck with my grammar. Until next time guys!! mwah mwah

Martes, Agosto 16, 2011

P-CHAN small flush pig toy

Badtrip ako yesterday at work when I first drafted and came across this photo in my computer. It's my picture of a small cartoon character from RANMA 1/2 pig named P-CHAN, I did last year when I was still inlove with this guy. Yes, I'm that cheesy and fortunately for me the guy I gave it to turns out to be a moron, much to the delight of my family! 

sorry about the photo's quality, didn't foresee that I'll be
putting this pig into good use...

I had always liked the show plus P-chan complements the guy's features perfectly lolz. So I scour the net for a free pattern of P-chan and find it here together w/ another much larger stuffed pig. Below is a copy that I trace so you guys can print it in a small letter size bond paper with ease.


Enlarge it as much as you like.

Connect the letters to which part goes to what part.. carry diba?

Felt fabrics are the best for this project, it is available in your local textiles stores. I got a range of colors cus I use it as patigas on my bags, mine came from VCM Trading at Starmall Alabang, Carolina's lace shop at Megamall and Divisoria. It is expensive for P100 per yard, depends pa sometimes to the color. But when you see the end result with flush toys c'mon worth it na I think!

Instead of purchasing another yard, I used a medium weight pink cotton for the nose. Thought you can buy half a yard on other stores. Silver pens is the best for outlining your black fabric so do get one. I won't go on with the steps cuz it'll be much easier to refer to the website I got the pattern from. Even got this photos right here of ranma the main character, I know some of you might not be familiar with it...kaaliw eh :-)


No-brainer tlga sewing this. I just use my tamad version of an overhand stitch like the photo below and I managed to finished it in 4 hrs. or so. Afterwards I even hand-stitch my endearment (@##*** vomit**) for him at the time on the pig's side belly. Mind you with heart pa ah!!


So that's all you'll need to know! Good luck with this project! I enjoyed doing it!!! Before I end this post, I'll share the picture of the loser who had pa the nerve to pursue other girl while dating me. Hahahahah Now after sharing this I can find peace na in erasing these photos. HAHAHAHAH (in my head I'm laughing just like a villain!)

I even took a photo of him holding it, to cherish his reaction seeing
the pig! LOLZ This is a classic 'mura' moment for me....

Andrew E didn't know any better when he sang "Humanap ka ng panget at ibigin mong tunay" right? Mean ko ba!? LOLZ Let me know what you think. I would love to hear from you guys please..hehheheh I super enjoyed writing this post!

Until next time guys! :-)

Linggo, Agosto 14, 2011

TOTE BAG TUTORIAL totally totally!!!

Yesterday I thought of doing the simplest bag I learned in Bag Making class. Only I skipped through preshrinking the fabric (washing and ironing it w/ fusible pelon). Fusible pelon is readily available on palengke, just mention yun ung shiny on one side.


Mom's scraps of medium to light weight cotton canvas
For years I haven't bought a single tote bag for myself cause I know I can easily whip one out from my mom's scraps of fabrics. I'm not strict-by-the-books kind of gal w/ sewing, I taught myself lang from an early age. So I want this tote bag to be easy. I first cut my canvas with measurements below. Dimensions are in inches.


Once again I should have iron it, but its for my lunchbox lang so why bother :-)
I folded first the handle into half then sewn the folded edges together...


I sewn this handle on the body measuring 1.5 inches from the center, so the handle is 3 inches apart from each other.


The inside lining is then sewn on top of it sandwiching (gandang term) the handle in between.


I did the other handle next without the fuss of taking pictures again. Kinda tricky holding the camera on my left and my right hand holding the fabric right there, I'm right handed and pasmado so ang saya! I next fold the main body facing the right side. Then sew both sides closed.


I drawn and cut next 1.5 square inch on the bottom corner of my bag. 


Belated I realized that without full lining, the edges will be messy so I cut 2 random size canvas to cover my edges... Thank god I took photos cause I'm having a hard time na with my english! X )..


I folded the edges of those two and sewn on top of my raw ends.


I then sewn the opening of my bag. First the top then the folded edges of my short lining.


Instead of gusset (term for the fabric added on the sides of the bag that determines the bag's width) I use darts to add body to my bag, hence the cut off square on the corners.


You can see that the raw ends are already natatastas so I sewn it shut near its edges on the right side of the bag.


we're sooo close!


I then turned the bag inside out and sew my darts shut hiding the raw ends inside, making the insides all neat and not prone to ripping when washed.


After completing my oh-so-easy to follow steps, you'll came up with this bag right here.


10.5 in H x 9in. L x 4.5in. W... perfect for my lunch box!
I think I did this for less than 3 hours, it'll be much shorter than that for you guys! Because you won't  have to figure the sizes and take pictures along the way. Hope I can inspire you guys to sew your own bags! Its the littlest details of a home made bag that makes yours differ from those of mass produced ones. Let me know what you think of my first tutorial!!!


Until my next post guys!ciao!!!